Follow this blog with bloglovin

Follow on Bloglovin
Showing posts with label doily. Show all posts

Monday, January 12, 2015

All Abuzz


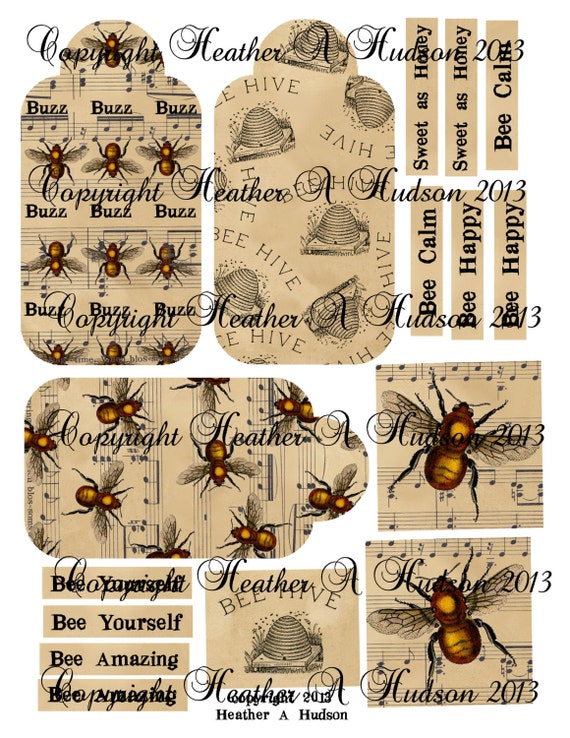
I've been playing with the Vintage Bee 
Calm collage sheet from My Artistic Adventures all week. I made a simple card by layering a tea colored doily over kraft card stock, then added two images from the Collage sheet along with some black paper. I added Liquid Pearl drops around the edge of the tag shape and called it done! Not every card has to have half a dozen techniques or layers. 

Vintage Bumble Bee Calm Digital Collage sheet

I was buzzing along having so much fun in my scrap room that I also made a tag...

See the cute bumblebee button? I've been saving this bee ribbon I found at Michael's and it was perfect for these collage sheet projects!

...and then I decorated an envelope to go with the card I made a few days ago. I didn't have enough of the yellow striped paper to line the inside of the envelope, so I wasn't quite sure how I was going to make it coordinate with the card. Then it came to me - what if I ran the envelope flap through the Cuttlebug and embossed it with the honeycomb design? 


I used my oval scallop punch on what little bit of yellow striped paper I had remaining, used a small round punch on a bee image, and voila! Now the envelope flap has the same honeycomb texture as the card.


I usually don't decorate the envelope other than 
to stamp a coordinating image onto the front upper or lower corner. This adds a bit of panache and also helps me to remember what the card's theme/design is when I have them stored and waiting to be mailed out for the right occasion. 


I had so much fun decorating the flap for this
 Bee Happy card that I think I'm going to 
emboss others!


sharing this post with:

Wednesday, November 6, 2013


I used my Verve stamps to make this get well card for a dear friend. She is an avid tea drinker and I thought the 'feel better blend' was perfect for her. I dry embossed the hugs and kisses and used Mary Engelbreit paper. I blended a little Distress Ink Spun Sugar on the embossed card stock and finished it off with pink bakery string.


I think I have recovered now from a full day standing outside El Capitan theater on Monday in Hollywood. Whew! Handyman, College Girl and I went to our first-ever movie premiere, and it was for Marvel's Thor II. By going to the premiere, I mean standing alongside the red carpet for the cast and crew to walk by as they head into the theater. I have to edit the photos, and then I will share what we did and who we saw.


 College Girl is a huge Marvel fan. Tonight she and I are going to see the opening of Thor 2, The Dark World. We hear the movie is fast paced fun with some surprises. Can't wait to see what happens with Loki.


Tuesday, April 2, 2013

Baa, Baa!


It's been more than three weeks since I've been in my Scrap Room and almost that long since I've been upstairs because of my leg! I limped my way up the stairs today to make two cards using my new Terrye French  Sheep With Flower Basket stamp (#106), and it was worth it. I had fun!


I design cards for Treasured Times Rubber Stamps


I used:
  • Kathy Davis Journeys card stock. It's gorgeous! There are a variety of pretty blue and green prints and some sparkly dragonflies.
  • small doily
  • Spellbinders & Cuttlebug to cut solid green mat
  • Terrye French Sheep with Flower Basket stamp
  • ribbon, ink, corner punch, foam adhesive
I made a second card with the stamp and went with a completely different color scheme.


On this card I used:
  • Cuttlebug and embossing folder, sand paper
  • bakery string
  • doily
  • Liquid Pearls, yellow
  • Maya Road Star pin
  • blue paper flowers, yellow ribbon rose
  • Ranger black Archival Ink, yellow glitter
  http://www.highlandstoneware.com/images/full/267.jpg
How charming to drink your morning cuppa from this whimsical sheep cup made by Highland Stoneware
in Scotland. It holds 8.5 ounces and is safe for the dishwasher, freezer and oven! 


Did you pull any April Fool's pranks on Monday? College Girl replaced Handyman's daily cereal with dry cat food - she poured his cereal into another container and replaced it with kitty chow! He gets up at the crack of dawn everyday and always has a small bowl of his favorite cereal. Isn't she a rat?! Ha Ha! She placed a note in the fridge, under the milk, regarding the whereabouts of his actual cereal. He recognized kitty's dry food and didn't eat any and College Girl had some 'splaining to do' when she got up later in the morning! I awoke when she did and could not help laughing when Handyman gave me a wry look!


sharing this post with;

Wednesday, February 29, 2012

Peep, peep!


 Oh my gosh! So many cute ideas are popping up on blogs...check out this idea for a cheery cake made with Peeps~

 Can you just picture this sunflower cake being served during a teatime, brunch or outdoor picnic? Too fun! The directions can be found at The Family Kitchen. Is there something you make with Peeps? Here is another easy thing to do that yields nice results~

Just cut the center out of a large doily (you will cut the outer edge from the doily, same difference!) and wrap the resulting strip around a cupcake. Secure with sticky dots or tape.


Sharing this post with~
Brambleberry Cottage

Tuesday, September 13, 2011

Mon Jardin~

Magic to my ears...the word 'garden'! Usually anything to do with gardens gets my attention. I enjoy visiting botanical gardens, formal and informal gardens, and plain ol' backyard herb gardens. Isn't it interesting when you discover something about yourself? I've discovered I really like china patterns that are less formal. Don't get me wrong, I also appreciate gorgeous design and elegant colors. But it took me years to choose a china pattern for our home because all the dishes I saw seemed too fancy for our little family, and I wanted to be able to use the dishes regularly and not feel like I was underdressed for the occasion! The dishes we ultimately chose have a more casual feel than some others and we love them. (I will feature them sometime soon). When I found this teacup by Villeroy & Boch I knew I had found another pattern I would love and use forever.


Isn't it pretty? I love the golden brown bamboo and luscious ripened fruit. I also really like the burgundy trim on the edges! It is sitting on a beautiful hand stitched linen doily I received from a special lady who has a wonderful blog.


Using this cup at teatime immediately affects my mood...seriously! The grapes, strawberries and peaches make me think of summer and the pear and apple whisper Fall and Winter~


Something else I like to do besides look at gardens is tour model homes. My husband likes to go too, so whenever there is new construction in our area we make a date day of visiting the models and going out for lunch. We glean decorating ideas from seeing the furniture placement and room accessories.


Great idea for a large kitchen island~ use a tray to display a favorite book, plate and cooking oil!


Unusual color scheme....navy, gray and lime. The wainscotting doubles as a headboard and the nightstands are taller than the bed, but it works!


I love the neutral, unpatterned sofa and chair paired with patterned pillows. The sofa coordinates well with the wall, and color is brought into the room with drapes and an accent pillow. After years of having a patterned sofa, we recently bought a plain sofa and chose a paint color that was similiar...taking a cue from the professionals! lol~ Now I can change out the pillows seasonally and add color and design that isn't permanent.


sharing this post with;

Saturday, January 29, 2011

Playing with Crayons~

My friend Heather shared a fun technique on her blog using Crayons and ink! See her artwork here. Isn't it funny how you have done something before but it did not occur to you to do the same process in another situation? What I mean is that I have used crayons to draw on hard boiled eggs at Easter, then dyed them...it just never occured to me to use crayons on my tags or cards, then ink them. I rummaged through my daughter's discarded pencil boxes from school and found some crayons! I gathered my ink, blank card & tag, stamps and adhesive.
After I inked & stamped the tag, I stamped the face image using Wendy Vecchio Studio 490 stamps, and matted it with square-punched cardstock. Next, I drew spirals on the blank white card using Crayola's blue green crayon. I blended Distress Inks over the spirals. Then I assembled and embellished. I love how it came out....and to think I have a box of 63 more colors to try! :)